Candle Care

Preparation

Careful preparation will contribute significantly to the performance of your Marklin candle. As you set up your candle, please keep the following guidelines in mind.

    • Make sure your candle is sitting straight in its holder by looking at it from all sides. A leaning candle will bend over time.
    • Trim the wick to no less than 3/4". Candles with a large diameter will require a longer wick; use up to 1" for a candle with a 4" to 5" diameter.
    • Make sure the wick is standing straight up before lighting. A bent wick will cause the candle top to melt unevenly.
    • Position the candle in a location free of drafts. Drafts cause the flame to move, resulting in uneven melting.
    • We strongly recommend using a follower with beeswax candles. Followers control candle melting rates, prevent dripping wax, and aid in minimizing drafts.  
Lighting

Although lighting candles is a common task, sometimes important steps are overlooked.

    • Light a candle by touching the flame of the lighting taper near the base of the candle wick. Hold it there until the flame transfers to the wick.
    • Take care not to touch the wick with anything other than the flame. You do not want to bend the wick.
    • Never discard an extinguished match or any other debris into the top of the candle. This can cause a 'double burn'.
Performance

As your candle burns, here are some things to watch out for:

    • Never leave a burning candle unattended.
    • Each time you light your candle, allow it to burn long enough for the pool of melted wax to approach the inside edge of the follower. For small diameter candles, it         will reach right up to the follower, for larger diameters, it may reach within 1/16" of the follower. If this rule is not followed, your candle will develop a problem
            known as 'cratering', or burning down the center.

Please refer to the chart below to determine the appropriate burn times for your candle size:
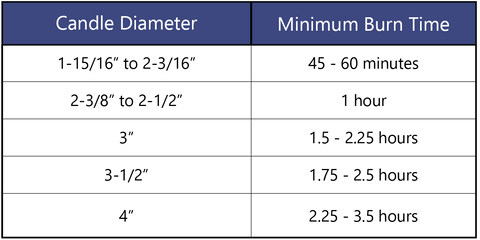
    Marklin Candle Burn Times Chart

      Extinguishing

      In proper candle care, the end of the life of the flame is as important as its beginning.

        • Never blow out your candle. Instead, use an extinguisher to eliminate the flame. The extinguisher should be placed gently over the candle, without any downward       pressure applied. You do not want to damage the wick, the follower, or the softened wax.
      Troubleshooting & Common Concerns

      When all of the above guidelines are followed, your candle should perform as expected. Below, we list for you some adverse performance symptoms, the cause, and a corrective measure to be taken.

      Smoking Flame

      This is a sign of either the wick being too long or a draft being present. If necessary, trim the wick to the appropriate length. Also, make sure that the candle is away from any drafts.

      Cratering

      When your candle is not allowed to burn long enough each time that it is lit, cratering will eventually occur. Follow the recommended burn time for your candle.

      Bent Candle

      A candle that is not sitting straight in its holder will start to bend in whatever direction it is leaning. Make sure that it is sitting straight by looking at it from all directions.

      Reconditioning

      If your candle's wick becomes too short to support a strong flame, or if cratering has occurred, it may be necessary to recondition the candle.

      1) Begin about 5 to 10 minutes after extinguishing the flame. The candle top should  still be warm.

      2) Slowly remove the follower.

      3) Use a sharp knife to slowly trim away any outer edge of the candle top.

      4) With a spoon, gently remove the soft wax in the pool around the wick, carving almost out to the edge, removing any contaminants such as match heads or        wick pieces, until the proper length of wick is exposed.

      5) Completely clean all wax from follower and any drippings from the side of the candle.

      6) Replace the follower firmly onto the candle top by gently resting the follower on the top of the candle and securing it with a quarter turn.

      7) Relight your reconditioned candle.